How to make a backdrop for a felt brooch. DIY felt brooch
Felt becomes the basis for making many things: toys, fruits, flowers and, of course, decorations. Various products are in fashion today self made: felt brooches, hairpins, key rings for bags. A handmade accessory will turn an ordinary outfit into an exceptional one.
It's very easy to do and looks great. Take a pattern and cut out the petals using it. It is advisable to leave free space in the center. Cover the blanks with matching threads to make the product look neater. A button is sewn in the center. The base is glued on the back, to which the base for the brooch is then sewn. That's the whole trick. The field for creativity is huge.

Instead of the base, you can use a regular pin, just sew one leg to the base.

- Felt.
- Floss to match.
- Needle.
- Beads or a beautiful button.
- Pattern.
- Brooch base.
Felt is taken in small pieces - you can use different colors. Cut out the required amount according to the pattern. A cut is made in the petals so that the brooch eventually acquires a convex shape.

We thread the needle and sew up the longitudinal cuts. The flowers have become voluminous.
Attach a button or bead in the center. A round base is sewn from the bottom, covering the back. We fasten the clasp. The felt brooch is ready. We wear it with pride and pleasure.

Small master classes will help you make an equally beautiful brooch, or become the basis for your own idea.


The basis for this beautiful dahlia is also felt. Undoubtedly, this brooch will attract attention, and it is easy to make.

Most of the time will be spent making the petals. To make them curled, you need to fix the edges until the glue dries. Otherwise, the material will take its original shape.

Then the petals should be planted in rows on the base.

On the reverse side there is a pocket to carry a photo of your child or loved ones.


Patterns make the work much easier for those who want to get a specific result in the shortest possible time.

Photos of other people's work often inspire creativity. Many brooches can be made together with children, because this is a very simple and pleasant material to work with.


And here are some more interesting ideas. 


Felt is a universal material. When doing needlework, you can sew anything from it: from toys to jewelry. It is plastic, holds its shape well, and does not crumble. To make a brooch like this for yourself, you don’t need to have a lot of experience or any special skills. Any, even the most inexperienced needlewoman, can make a brooch.
Making a brooch from felt
Let's make blanks for the buds. We cut out three squares of different colors with dimensions of 2.5x2.5 cm. We also cut out 3 squares of green felt with dimensions of 2x2 cm. We cut the floral wire into three pieces, each 5 cm long.

Now you need to form flowers from each square. To do this, we cut out indentations on each side until the petals are formed. Using a utility knife, make small holes in the middle just so that you can freely thread the felt onto the wire.

Leave a wire 1.5 cm long above the surface of the flower.

We apply glue from a gun to the end of the wire and attach two petals opposite each other to it by the edges.

In the same way we attach the other remaining petals, only to those that are glued to the wire.
Now we string a green flower onto the wire, which will serve as leaves. We apply glue in the middle and tightly fasten the workpiece to the bottom of the bud. Then we glue the petals so that they fit tightly.


We get these unopened flowers.

They need to be wrapped. To do this, cut out a leaf with a total length of 7 cm from green felt.

We attach the branches with buds in the middle at the bottom of the leaf, forming a bouquet. If necessary, cut off excess wire.

We tie the bottom part with ribbon.

The bouquet of buds is ready. It can be used as a brooch, attached with a pin.
In this article you will learn how to make felt brooches with your own hands. We have collected for you the best master classes for beginners and experienced craftsmen, as well as ideas for inspiration, useful tips and various step by step instructions with photos and videos. A brooch in the shape of a cute hedgehog or fox, neat hearts and gorgeous flowers - we hope everyone will find something to their taste in this selection. We will tell you how to learn how to make them at home without much difficulty.
Felt brooches are very popular today. Of course, homemade jewelry is especially valued, because it is original and unique. We tried to select master classes on sewing felt brooches for every taste and age. If you don’t find what you were looking for, just study the technology for creating this decoration, and then take a stencil and tailor the master class to suit you.
Hedgehog
This cute homemade felt brooch will look appropriate on both a little girl and an adult girl (if dressed appropriately). It will take you literally 10-15 minutes to make jewelry at home.
We will need:
- felt in two or three colors;
- thick thread for sewing;
- cotton wool or synthetic winterizer;
- bead and any decor;
- accessories for brooches;
- Super glue.
Felt can be different, and for this brooch it is better to choose one that is not too soft, so that it is easier for you to sew, and the finished craft holds its shape better.

On a piece of felt of the main color of the brooch (these will be the hedgehog's needles), draw a silhouette - as shown in the photo. Cut out two blanks of the same size. From felt of a different color, cut out the body of a hedgehog and sew on a beaded nose, and then embroider the eyes. If you have felt in another color, use it to make hedgehog feet. It is better to place them on glue, and then add “claws” in the form of threads.
We sew the blanks together, placing a small piece of soft padding inside. We sew along the front side, trying to make the stitches the same. Then we sew the two main blanks of the future hedgehog brooch together - we make the stitches the same again, we sew along the outer edge.
We attach the fittings to the inside of the brooch. If you don't have one, sew on a regular small pin.

The felt hedgehog brooch is ready - all that remains is to add a little decor (you can make it again from felt). Jewelry made in the same color scheme or contrasting colors looks very beautiful. By the way, instead of needles, you can sew long ears and make a hare, not a hedgehog - the technology will be the same.
Fox
This felt brooch in the shape of a fox will appeal to little girls and older girls. This decoration can be worn on a blouse or a plain cardigan, or attached to a bag or backpack. Sewing such a brooch with your own hands is quite simple, and you can use leftover felt from other crafts as the main material.
We will need:
- small pieces of light felt;
- scraps of fabric in bright colors;
- floss;
- accessories for brooches.
If you do not have a suitable piece of felt for the base, and you do not know how to make a blank, replace the felt with a regular cotton pad. In this case, this is acceptable.

From the fabric you need to make a blank for the fox’s head (a white semicircle), ears and nose (red or ginger), and a dress (to your taste). First we sew the dress, then the head, to the round or oval felt blank for the brooch. Next we sew on the ears and nose.
Using thin floss threads, we make embroidery: eyes, tip of the nose and any decoration for the dress to your liking. To make the brooch look neat and complete, on the remaining edges of the felt we do embroidery with floss threads of any suitable color - just regular stitches.
At the back, we sew or glue the brooch fittings to another piece of felt (or a cotton pad). Then we sew the main and back parts together (at this stage you can add a little sealant made of cotton wool or padding polyester) and finish the edge with embroidery.

The felt fox brooch is ready! Please note that you can create a decoration with any animal in the same way - you just need to change the shape of the head.
Hearts
This is a very simple master class for beginners, with which you will quickly sew a lot of felt brooches in the shape of soft hearts. You can adopt this idea and use it by February 14, or you can wear such jewelry in everyday life. A great idea is to decorate a preschool or school-age girl’s bag or cardigan with such brooches; they are always delighted with such accessories.

We will need:
- scraps of colored felt;
- floss threads to match the flaps;
- cotton wool;
- small pins.
The master class in this case is elementary. First, cut the felt into squares of the same size (depending on the desired size of the brooch). Then we cut out the hearts using stencils or ourselves. You can cut the felt very beautifully using fluted scissors to make the edges of the brooch curly.

We sew two pieces together, put a little cotton wool inside. We make the seam along the edge with neat stitches. All that remains is to sew on a pin - the heart brooch is ready!

We advise you to make several brooches at once, so you can cut the felt at once and not waste time on it. By the way, such jewelry can be used not only as brooches, but also as a basis for creating hairpins, elastic bands and other accessories.
Flower
A lush flower is perhaps the most popular felt brooch, as women and girls of any age can wear it. This homemade decoration It will look appropriate on a little girl, her mother or sister, and even her grandmother. The main thing is to choose the right color.

We will need:
- felt in three colors;
- rivet;
- accessories for brooches;
- Super glue.
From white felt (pictured) we cut out two equal-sized circles of small diameter. From the felt that we will use for the flower petals, we cut out small trapezoids. We will also prepare a small strip of felt to make a neat fringe around the core - for this we will make neat cuts along its entire length.

We cover the rivets with white felt, with the help of which we will then fix the accessories for the brooch. Then we trim the “core” of the flower with fringe along the entire contour. Next, we cut the petals a little and paste them over the brooch blank on all sides. Add one or two more layers of petals to make the decoration look more voluminous.
Glue the green petals and secure the fittings with a rivet. Our chic homemade felt flower brooch is ready! Add it to your outfit to brighten up your look.
Craftswomen of the modern world are very inventive and can create a unique item from scrap materials. So, for example, a do-it-yourself felt brooch is one of simple ways make an original accessory yourself. Every fashionista will appreciate this interesting type of jewelry. To create this brooch, you don’t need to be a master of needlework, just follow simple instructions which any master class presents.
The material itself is inexpensive and gives the opportunity to fantasize. A special place is occupied by jewelry, which is decorated with various decorative beads, buttons, and ribbons. Lately, many girls have been liking brooches made with their own hands, decorated with various bright beads or ribbons. Using felt, you can create any decoration that will last a long time and will always be in trend.

Beads in hand
In this master class we will learn how to make a beautiful brooch from felt and beads in the shape of a flower. This decoration can be worn with a regular light blouse, or decorate a coat, hat and even a scarf.
You need to understand that bead weaving is painstaking work, during which you need to concentrate and focus on the result.
What you need to prepare:
- scissors;
- beads;
- felt;
- pebble;
- glue;
- needle and thread.
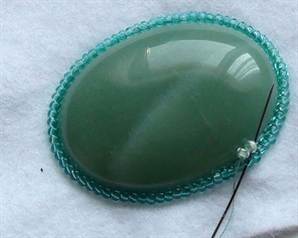
We take felt and cut out a piece from it that will be slightly larger than the brooch itself.

Take a large pebble and glue it to the felt. We take the threads and use them to attach the beads. For those who are just starting to learn how to make brooches, it is best to use medium-sized beads, since small ones already require experience. Let's start embroidering the brooch. The needle needs to be brought to the front side, but we need to stay a couple of millimeters away from the stone. We string a bead onto a needle and insert the needle into the felt so that the distance is approximately the same as the diameter of the bead.
Next, we take the needle out behind the beads and pass it through the bead again, then we string the next one. And again we repeat the same steps. The needle must be taken out by two beads and again we string the third one. Draw a needle behind the two previous ones and string the next one.


In this way we stitch along the contour of the entire stone. The photo shows what should happen. Next we need to make a second row; to do this, remove the needle from the felt and string a bead of a different color onto it. And then we put the needle into the bead of the previous row. We pass the needle through the bead, which is located in both the first and second rows. Afterwards, we need to pull it through the bead, which is located first in the second row. And we take it out from the previous row and pull it through the second bead. We put the next one on the needle and pull it through the next one in the first row. And we do this in a circle. And then you can play with your imagination and come up with something else.

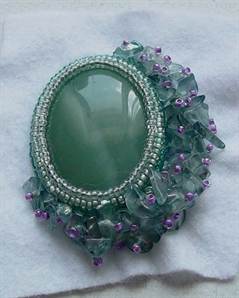
In this master class we will also decorate with stone chips. Such crumbs can be attached to our brooch using beads. It is necessary to ensure that there is no void between the crumbs. The brooch will not be decorated along the entire perimeter, but only partially.
Now we take a different color of beads and make the third row using the same technique. We cut off the unnecessary felt and draw the outline of the brooch on a piece of paper and transfer it to a piece of leather. We trim the leather pattern around the edges with beads and insert a clasp. Only after this we glue thick paper to the leather part and sew beads to beads, the leather part and the felt part. Ready.
When making such a masterpiece, you don’t have to adhere to exact rules; you can do everything as your imagination allows. The main thing is to weave the beads correctly and stick to the sequence.


Lightning decoration
In this tutorial we will learn how to make a brooch from felt and lightning, which is very original and unusual. Everyone has a zipper in their home that has not been used for a long time. That’s why you can use a regular zipper and felt, and we’ll get a charming leaf-shaped brooch. This decoration will look good on a scarf, hat or jacket, or coat.
What you need to prepare:
- green felt, the thickness of which will be 3 mm;
- black felt 1 mm thick;
- wool, which is used in needlework;
- needles for felting;
- clasp;
- bugles;
- lightning;
- candle or lighter.

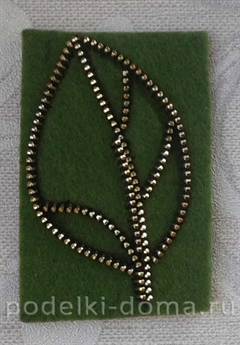
Let's get to work. We cut the zipper as close to the teeth as possible. Then we take a lighter or a candle and singe all the threads where the cut was. We take green felt and draw a leaf on it, but with all the veins. Place the zipper on the outline of the leaf and sew it on. It is important to sew to each tooth so that the zipper stays in place, and to make a few stitches at the end. It is better to start embroidering the inside so that it will be easier to form the outer lines later. Then we take small pieces of zipper and sew on the veins in the leaf.
Once we've zipped around the outlines, we'll start felting. It is important that there are different colors on each side. It is better to place a sponge under our sheet and use a special needle to felt it, while piercing the base of the sheet along with the wool. If necessary, you can add more wool.


When we finish felting one part of the leaf, then we change the color of the wool and move to another zone of the leaf. Look at the photo below to see how it should turn out. We leave the largest area without felting, and embroider one of the zones with beads or glass beads of black and green color, which should be elongated. We take scissors and cut off unnecessary pieces of wool from the back of the brooch to get a smooth surface. Now you should cut off the unnecessary felt, but carefully so as not to catch the stitches with which the zipper is sewn.
Now we make patterns on black felt, which will be the back part of the brooch. Sew the fastener to the black part and sew the two parts of the leaf together. Our brooch is ready!


Video on the topic of the article
This article provides a video selection with which you can learn how to make a felt brooch.
If you think about it, not long ago brooches, and jewelry in general, were made only from precious metals and decorated with precious stones. And they cost incredible amounts of money. Current fashion is more democratic - in our time, fashionable brooches can be made not from such expensive materials: leather, plastic, felt or felt. And instead of gems, they can be decorated with satin stitch embroidery and a scattering of bright beads. This does not prevent them from looking simply masterpiece at times! And the motives can be not heraldic symbols, but a cat or a fox, a little girl, autumn landscapes - everything that the master’s boundless imagination gave birth to. And if the master is a beginner, then the diagrams found on the Internet.
There are many master classes on making felt brooches with your own hands. This accessory looks interesting and unusual. Brooches can be created in a variety of shapes and sizes, and the uses for this type of jewelry are almost limitless.
A brooch in the classic shape of a flower or leaf will perfectly complement a festive suit, dress or blouse. If you use bright shades of felt and playful shapes, the brooch will delight your child or become an original gift for friends and family. A huge variety of accessories can be made using rhinestones, beads and zippers. This mk will help with this.
Making a brooch is very simple and does not require special skills.. Children will also enjoy this activity and will develop their imagination and fine motor skills. Let's take a closer look at how to make a felt brooch. The master class for beginners is presented in the form of 3 lessons.
To make a brooch in the shape of a flower you will need:
- cardboard;
- bright felt (thin) red and green;
- threads with a needle;
- scissors;
- black floss;
- padding polyester
How to make a felt flower:
- Take a small piece of cardboard and cut out a poppy petal in the shape of a semicircle. The edge should be a wavy line with a raised area in the center.
- Make 6 elements using the template. To do this, attach the pattern to the felt and cut along the contour.
- The bottom edge of each copy must be sewn together to form a petal.
- Cut a small circle from a green piece of felt.
- Sew along the edge with green thread and pull it into a basket shape. You need to place a small piece of padding polyester in the center to give volume to the future poppy core.
- Sew all the petals together, overlapping one another at the base.
- Take black floss threads and wrap them around your palm. Remove, tie in the center and cut. Thus, stamens are obtained.
- Sew black threads into the center of the flower.
- Place the green bag on top of the stamens and secure with threads.
- A beautiful and elegant flower is ready, all you have to do is attach the base to a pin and you’re done.
Gallery: felt brooches (25 photos)


Brooch made of felt and beads in the shape of a cat
 This interesting and funny brooch is perfect for decorating children's outfits.
What you will need:
- multi-colored beads (black and white);
- a piece of dense material, for example leatherette;
- scissors;
- glue;
- cardboard;
- needle and thread for sewing;
- kitten template (you can draw it yourself);
- soap or chalk;
- base for a brooch or pin.
Step-by-step instruction:
- Take black felt and transfer the kitten pattern using chalk. Cut along the contour.
- We make the head from white felt. Here we cut out the area of the eyes and muzzle.
- Place the white parts on the black felt. We sew all the elements of the kitten together.
- We embroider with beads along the edge of the product, thus combining all the details.
- We fill the entire surface of the brooch with embroidery to create a beautiful kitten.
- We cut out another outline from thick fabric and one from cardboard. They will serve as a base.
- Using glue, attach the cardboard layer and the “beaded” layer.
- Take a pin and insert it into thick fabric.
- Glue the base with a pin to the cardboard from the back.
- The original brooch is ready.
Brooch made of felt and zipper
 Charming brooch in the shape of a leaf will go harmoniously with almost any outfit. Anyone can make such an accessory. What you will need:
- black and green felt;
- scissors;
- sewing threads;
- wool and needle for felting;
- pin;
- sponge;
- lightning;
- cardboard;
- lighter.
How to make a brooch:
- Take the zipper and trim everything except the zipper line. To make the edge look smooth and neat, you need to use fire to scorch the cut area.
- On thick green felt, draw (with a thin, invisible line) a leaf. Draw all the veins.
- Take the zipper and lay it along the contour, cutting off excess pieces with scissors.
- Sew first along the edges of the sheet, then to the veins themselves. Make stitches through each zipper tooth to make the fastening more secure. To make the lines expressive, you can lay the zipper in 2 rows.
- Thus, we got a leaf with 5 zones. Each area needs to have its own color, except for the largest section. It should be left empty.
- To fill the segments we will use felting technology. You need to place a sponge under the brooch for convenience. We fill all areas of the brooch with yarn, laying it tightly using a special needle. You can use beads or rhinestones to fill one of the areas. Here you can show your imagination to the maximum.
- Cut out the brooch along the outline of the zipper.
- We make another piece of leaf for the wrong side. We cut out a shape from black felt and attach the base for the fastener to it.
- Sew both parts together using neat seams.
- You need to glue the fastener on the back side.
- An amazing and delicate brooch is ready!
Thus, It’s very easy to design and create felt brooches with your own hands. You can take the master class as a basis and change the technology depending on your desires and imagination. Felt brooches look unusual and will definitely attract the attention of others.